Posts

Week 15: tutorial for the metal blister

Image
THE BLISTER TUTORIAL BEIL0014 – DIGITAL MAKING   Before creating the metal blister, it is strongly suggested to watch a tutorial video from the Youtube -  Metalshaping tricks # 5 , which it will help to understand the process and provide a outline for the creating steps:   Steps:  1. Creating the frame 2. Cutting the sheet 3. Shaping the deep 4. Finalising the blister Step 1 - Creating the module The based module made by MDF board should be draw and cut in following the specific outline by course tutors before the class. Two people would be a small group to create a pair of metal blister shape within two weeks, which the metal shape to be creating in the first week, and the second week should be left for adjusting with the group mate.  To creating the round shape in the middle, two tools should be carefully used into this process, which they should make the shape easy to cut and achieve smooth edge for later process - jigsaw, sander and.

Week 14: Finish the Ferrarri 250 GTO

Image
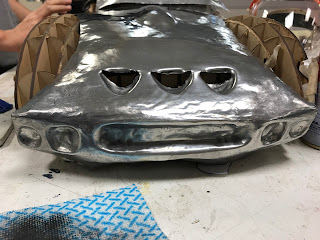
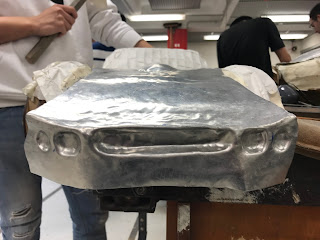
After 3 weeks modeling the Ferrari 250 GTO, all the metal pieces have started to place on the original board module. But Firstly, the three holes for the grille on the bonnet need to finish. At the beginning, using the module of three holes I made last week to draw the outline on the metal sheet, which this part should be careful for their location; Then it was started to drill small holes inside of the outline to create the gap for cutting the straight line; Finally, in terms of cutting just a straight line, using the jigsaw with a specific blade for metal sheet to create the line. (CAUTION: since the blade has thickness, we should to measure the location and cut inside of the outline). Eventually, I have finished all the holes and using plastic hammer with some thin timber stick to create the deep of the grilles, which just like the process of the blister.   Cutting out some extra edges for suit the original car module and group mates pieces. We started t

Week 13: Enhancing the front the grille and module for bonnet grille

Image
The radiator grille, fog lamp and the front bumper still were developing in this week and close to be finalised at current stage. The appearance is built to close the original design of the car as much as possible. However, the curved edge for the bumper is a very difficult part during this process, since I have tried to create the bonnet and the front bumper in one piece, and the front radiator and fog lamp shape also was built firstly, which it would not be easy to do curve process and different angles need to be beat and bend; two tutors demonstrated by themselves for this process to me at the left edge, and I tried to bend the right edge.  Using curve iron shape and hammers has to keep making the sheet fold and bend to form the shape. After a long time to adjust the front bumper, the shape and curve was closed with the edge of the car module. And then, I started to create the module of the three grille on the bonnet, which MDF board would be the first choice f